
Before you can bake a cake, you need to have the proper tools. This includes an oven and a cake pan. The size of the cake pan will determine the size of the cake, so choose wisely.
Most cakes are baked in either an 8-inch or 9-inch round cake pan.Once you have your cake pan, it’s time to prepare it for baking. The process is simple: just grease the bottom and sides of the pan with butter (or margarine) and then dust with flour. You can also use cooking spray as an alternative to butter; just be sure to coat evenly.
Are you looking to make a cake but don’t know how to prepare your pan? Don’t worry, it’s easy! Here is the basic way to prepare a cake pan:
1. First, you will need to gather your supplies. You will need a cake pan, parchment paper, and some cooking spray.
2. Next, you will want to cut the parchment paper to fit the bottom of the cake pan.
Make sure that the parchment paper is big enough so that there is some excess around the edges of the pan. 3. Now it’s time to assemble your cake pan! Place the parchment paper in the bottom of the cake pan and then lightly coat it with cooking spray.
Be sure to evenly coat the entire surface of the parchment paper so that your cake will not stick when it’s time to bake it. 4. And that’s it! Your cake pan is now ready for you to fill it with batter and bake your delicious creation!
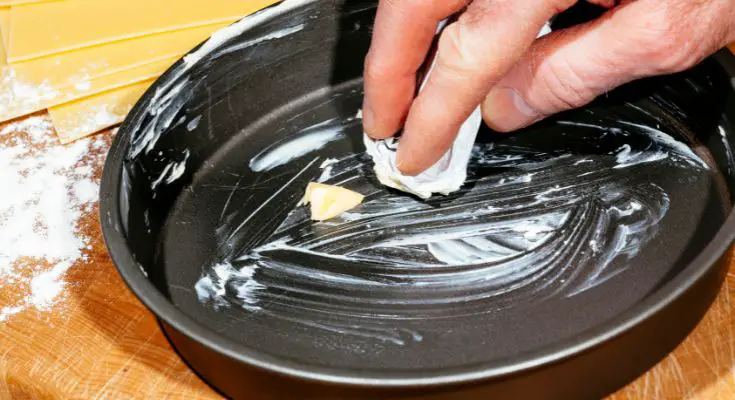
How Do You Prepare a Cake Pan?
When it comes to cake, the most important part is the pan. A properly prepared cake pan will ensure that your cake cooks evenly and comes out cleanly. Here are a few tips on how to best prepare a cake pan:
- First, make sure that your cake pan is of good quality. A flimsy or old pan will likely lead to an uneven or burned cake. If possible, invest in a good non-stick cake pan.
- Next, thoroughly grease the bottom and sides of the cake pan with butter or shortening. Be sure to get into all of the nooks and crannies so that the batter does not stick when baking.
- Once the cake pan is greased, you can line the bottom with parchment paper for extra insurance against sticking (and for easy removal once baked). To do this, simply cut a circle of parchment paper to fit snugly in the bottom of the pan and then lightly grease it as well.
- Finally, flouring the cake pan is optional but recommended if you are using an uncoated metal or glass pan. To flour a cake pan, simply add some flour to the greased surface and tap around until coated before adding your batter.
What is the First Step in Preparing a Cake Pan?
One of the most important steps in preparing a cake pan is to make sure that it is clean. Any grease or food residue on the pan can cause the cake to stick, making it difficult to remove from the pan. To clean the pan, simply wash it with warm, soapy water and dry it thoroughly with a clean towel.
Once the cake pan is clean, the next step is to prepare the baking surface. This can be done by either greasing and flouring the pan, or using a non-stick cooking spray. If you choose to grease and flour the pan, simply coat it with a thin layer of butter or margarine.
Then, add enough flour to cover the entire surface of the butter. Use a pastry brush or your hands to evenly distribute the flour over the entire surface of the pan. Be sure to tap out any excess flour before adding your cake batter.
If you opt for a non-stick cooking spray, simply spray an even layer over the entire surface of the cake pan. Be sure to shake off any excess before adding your cake batter. Once your baking surface is prepared, you are ready to add your cake batter and bake!
How Do You Prepare Baking Pans before Baking?
Baking pans come in all shapes and sizes, so there’s no one-size-fits-all answer to this question. However, there are a few general tips you can follow to ensure your baking pan is properly prepared before you start baking. First, take a look at the recipe you’re using.
Some recipes will specify what type of pan to use, as well as how to prepare it. If your recipe doesn’t include this information, try doing a quick Google search for more guidance. Once you’ve determined the best way to prepare your specific pan, the next step is to gather your supplies.
You’ll need something to grease the pan with – this can be butter, margarine, cooking spray, or even shortening. Then, you’ll also need some sort of flour or sugar to dust the pan with. This helps prevent sticking and ensures an evenly baked final product.
Now it’s time to get started! Begin by greasing your pan with whichever fat you’ve chosen. Then, add a liberal amount of flour or sugar and tap it around until the entire inside surface is coated.
Be sure to shake out any excess before adding your batter or dough – otherwise you’ll end up with a very sweet or very floury final product!
What Does It Mean to Prepare a Cake Pan?
When you’re baking a cake, it’s important to make sure your pan is properly prepared. This means taking the time to coat it with butter or cooking spray and then dusting it with flour. This ensures that your cake will release easily from the pan and have a nice, even surface.
It’s worth taking the extra few minutes to do this right – otherwise you might end up with a stuck cake or one that is lopsided and uneven.
How to Prepare a Cake Pan Without Parchment Paper
Whether you’re an experienced baker or a novice in the kitchen, there’s always room for improvement when it comes to cake baking. One area that often gets overlooked is the preparation of the cake pan. Many recipes will call for parchment paper, but this isn’t always necessary.
With a little bit of know-how, you can prepare your cake pan without parchment paper and still get perfect results. The first step is to choose the right size cake pan. If you’re using a recipe that calls for an 8-inch round cake pan, make sure your pan is also 8 inches in diameter.
The depth of the pan is less important than the width, so don’t worry if your pan is shallower or deeper than what the recipe calls for. Once you have the right sized cake pan, it’s time to prepare it for baking. If your recipe doesn’t call for parchment paper, you can grease and flour the bottom and sides of the pan with butter or cooking spray.
Be sure to tap out any excess flour so that it doesn’t end up in your cake batter. You can also line the bottom of the pan with wax paper or aluminum foil before greasing and flouring if you want extra protection against sticking. If you’re using a dark colored cake tin or one with a non-stick coating, there’s no need to pre-heat the oven before adding your batter as these types of pans conduct heat more evenly.
However, if you’re using a light colored metal tin or an uncoated one, it’s best to pre-heat the oven to 350 degrees Fahrenheit (175 degrees Celsius) before adding your batter.
How to Prepare a Cake Pan With Parchment Paper
Assuming you want a blog titled “How to Prepare a Cake Pan With Parchment Paper”: Parchment paper is an often overlooked but extremely important tool in the baker’s arsenal. When properly used, it ensures easy release of cakes and other delicate baked goods.
It also helps to prevent sticking and makes cleanup much easier. There are a few different ways to prepare a cake pan with parchment paper. The most common method is to trace the outline of the pan onto the parchment and then cut out the resulting shape.
Another option is to cut a rectangle or square that will fit snugly inside the pan. If your pan has unusual dimensions, you may need to piece together multiple pieces of parchment in order to get proper coverage. Once you have your parchment ready, lightly grease the bottom and sides of the pan with butter or cooking spray.
Be sure to use an even layer – too much fat will make your cake greasy, while not enough will cause it to stick. Place the parchment in the pan, making sure that it lies flat against all sides without any wrinkles or bubbles. Once everything is lined up correctly, give the pan a light tap on the countertop so that the parchment settles into place.
You’re now ready to bake!
How to Grease a Pan for Cake
When it comes to baking a cake, one of the most important steps is greasing the pan. This will help ensure that your cake comes out of the pan easily and without any sticking. Here are some tips on how to grease a pan for cake:
1. Start by using a paper towel or pastry brush to lightly coat the bottom and sides of your pan with shortening or butter.
2. Next, you will want to flour the pan. You can do this by adding some flour to a plate and then turning the pan upside down onto the flour so that it is coated.
Alternatively, you can sprinkle flour directly into the greased pan.
3. Once the pan is floured, tap out any excess so that there is just a light coating on all surfaces.
4. Your pan is now ready to use!
Be sure to follow your recipe instructions for best results.
How to Prepare a Pan for Baking
When you’re ready to bake a cake or some cookies, the first thing you need to do is prepare your pan. This will ensure that your baked goods come out clean and with nicely defined edges. Here’s how to prepare a pan for baking:
1. Preheat your oven according to the recipe instructions. While it’s heating up, lightly grease your pan with butter or cooking spray. Be sure to get into all of the nooks and crannies so that nothing sticks!
2. Next, line your pan with parchment paper. Cut the paper to fit snugly against the bottom and sides of the pan, then use a blunt knife or spatula to smooth it down. This step is optional, but it really helps to prevent sticking and makes cleanup a breeze.
3. Once your oven is preheated and your pan is prepared, you’re ready to start baking!
If you’re using parchment paper to line a cake pan, there’s no need to grease the pan. Parchment paper is already non-stick, so greasing the pan would just be an extra step. Just make sure to line the pan with parchment paper before adding your cake batter.
If you want to ensure your cake comes out of the pan in one piece, it’s important to grease and flour the pan with parchment paper. Here’s how to do it: 1. Preheat your oven and line your cake pan with a sheet of parchment paper.
Make sure the paper is big enough to come up the sides of the pan and overhang the edges slightly.
2. Grease the parchment paper with butter or cooking spray. Be generous – you don’t want your cake sticking to the pan!
3. Sprinkle some flour over the greased parchment paper and use your hands to evenly distribute it. Again, be generous – you don’t want any bare spots where the cake might stick.
4. Add your batter to the prepared cake pan and bake according to recipe instructions.
When your cake is done baking, let it cool for a few minutes before running a knife around the edge of the pan and carefully inverting it onto a plate or wire rack (parchment paper side up). Gently peel away the parchment paper and voila – perfect cake!
Cake Pan Use
When it comes to baking, there are a few kitchen staples that are essential. One of those is a good cake pan. Cake pans come in all shapes and sizes, but they all have one purpose – to help you bake the perfect cake.
There are a few things to keep in mind when using a cake pan. First, make sure that the pan is clean and dry before adding any batter. Any moisture will cause the cake to stick and make it difficult to remove from the pan.
Second, use an oven-safe liner such as parchment paper or silicone mat to prevent sticking and make cleanup easier. Third, preheat your oven before adding the cake batter to the pan. This will help ensure even cooking.
Once your cake is baked, let it cool completely before removing from the pan. If you try to remove it while it’s still warm, it’s likely to fall apart.
Conclusion
The basic way to prepare a cake pan is to grease and flour the bottom and sides of the pan.
