If you’re on the hunt for a dessert that’s as fun to make as it is to eat, this Ice Cream Sandwich Cake is a must-try. Packed with layers of creamy ice cream, whipped topping, and your favorite toppings, this cake is the perfect treat for any occasion.
Be it a summer party, birthday, or just a craving for something sweet, this no-bake dessert is sure to impress everyone who gets a bite. Plus, it’s so easy to assemble!
Ingredients List
Creating a refreshing Ice Cream Sandwich Cake requires just a few simple ingredients. Let’s break down what you’ll need to get started:
Ice Cream Cake Ingredients
- 24 ice cream sandwiches (make sure to pick your favorite flavor)
- 16 ounces frozen whipped topping (such as Cool Whip), thawed in the refrigerator
- Chocolate syrup
- Caramel syrup
- Toppings of choice: mini M&M’s, sprinkles, crushed Oreo cookies, toffee bits, chopped nuts, chopped candy bars, chocolate chips, or anything else you like!
Required Kitchen Tools
Having the right tools can make preparing your Ice Cream Sandwich Cake even easier. Here’s what you’ll need:
- 9 x 13-inch Baking Dish: This size dish is perfect for layering the ice cream sandwiches and ensuring that your cake has enough room to set.
- Spoon or Spatula: For spreading the whipped topping evenly over the ice cream sandwiches.
- Freezer: To chill and set your dessert before serving. Patience is key here!
With these basic tools on hand, you’ll be ready to create the most irresistible Ice Cream Sandwich Cake.
Assembling the Ice Cream Sandwich Cake
Now that you have all your ingredients and tools, it’s time to put together this delicious treat. The process is simple, and the end result is an indulgent cake that’s sure to be a crowd-pleaser. Follow these steps to create a layered masterpiece that’s both cool and creamy.
Layering the Ice Cream Sandwiches
- Prepare the First Layer:
Begin by placing 12 ice cream sandwiches in the bottom of your 9 x 13-inch dish. You may need to cut the last ice cream sandwich in half to fit it neatly into the dish. Allow the sandwiches to soften for a few minutes, which will make them easier to press down. If you’re using a deeper pan, you can skip this step and proceed with the layering. - Spread the Whipped Topping:
Once your ice cream sandwiches are set, take half of the thawed whipped topping and spread it evenly over the first layer of ice cream sandwiches. The whipped topping adds a light, creamy layer that complements the ice cream perfectly. - Add the Syrups:
Drizzle chocolate and caramel syrup over the whipped topping. Be as generous or as light as you prefer! The syrups will add a rich, indulgent flavor that will make each bite of cake even more irresistible. - Sprinkle the Toppings:
Here’s where you can get creative! Sprinkle mini M&M’s, crushed Oreo cookies, chopped candy bars, toffee bits, or any of your favorite toppings on top of the syrup layer. Feel free to experiment with different combinations to make the cake truly your own.
Building the Second Layer
Now that the first layer is set, it’s time to build the second layer of your cake. The process is similar to the first, ensuring each bite of this Ice Cream Sandwich Cake is packed with delicious flavor.
Adding the Second Layer of Ice Cream Sandwiches
- Layer the Next Set of Ice Cream Sandwiches:
Take the remaining 12 ice cream sandwiches and carefully place them on top of the whipped topping and toppings. As with the first layer, you may need to trim the last sandwich to ensure it fits perfectly in the dish. Gently press down on the sandwiches to make sure they’re firmly in place. - Spread the Remaining Whipped Topping:
Take the rest of the whipped topping and spread it evenly over the second layer of ice cream sandwiches. This will help seal in the ice cream and create a smooth, fluffy texture. - Add More Syrups:
Drizzle additional chocolate and caramel syrups over the whipped topping. This will give the cake an extra burst of flavor and make it even more decadent. - Top with Extra Toppings:
Don’t forget to add more of your chosen toppings to this second layer. You can repeat the same toppings from the first layer or mix it up for added variety.
Freezing and Serving the Ice Cream Sandwich Cake
Now that your layers are complete, it’s time to freeze the cake so that all the components set together, creating a perfectly firm and delicious dessert. Here’s how to finish it off and get it ready for serving.
Freezing the Cake
- Freeze the Cake:
Cover the dish with plastic wrap or aluminum foil, making sure it’s sealed tightly. Place the cake in the freezer for about 1 to 2 hours (or even overnight) to give it time to firm up. This step is important to ensure that the cake holds together when you slice it. - Ready to Serve:
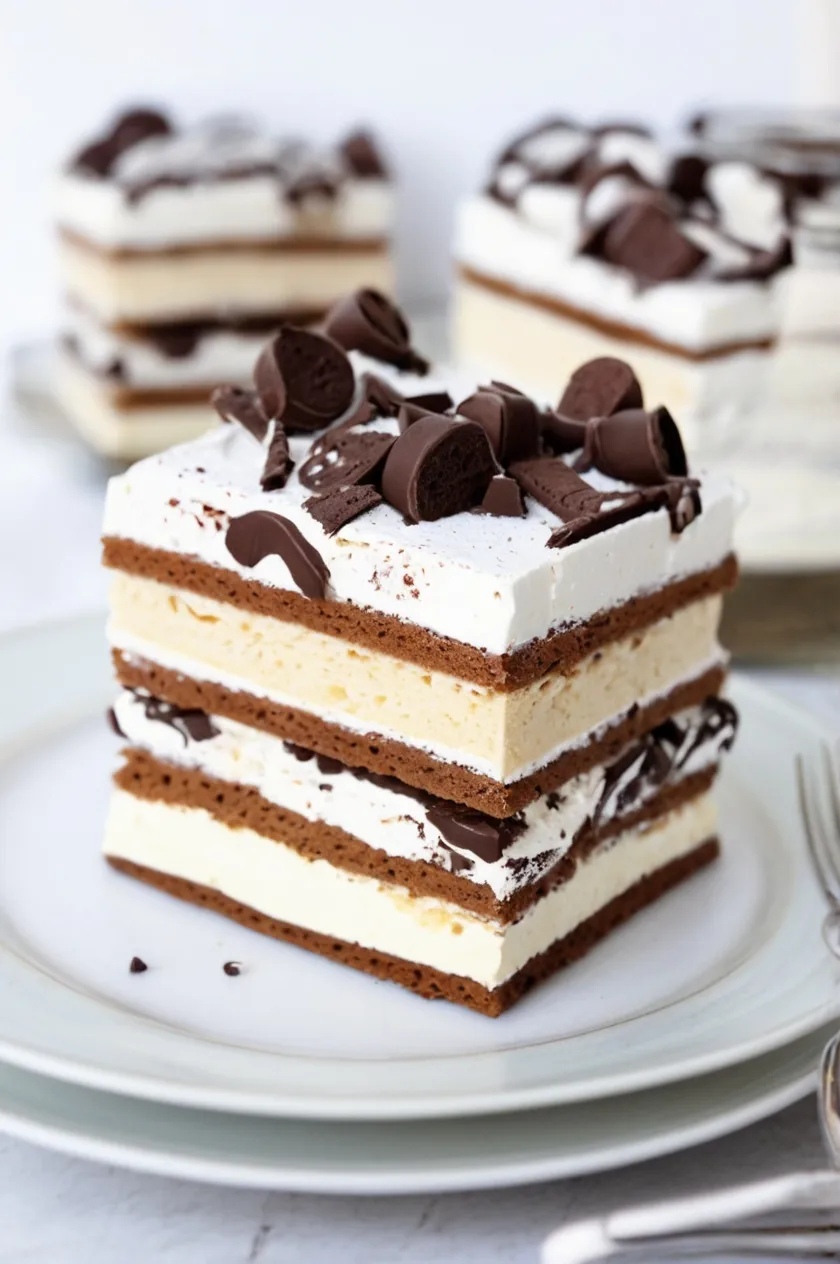
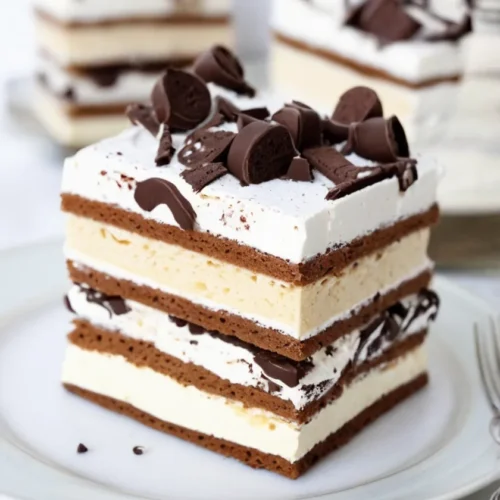
Once the cake has chilled and firmed up, it’s ready to be sliced and served. Use a sharp knife to cut it into squares or rectangles, depending on your preference. Each piece will have a delightful combination of layers, from the creamy ice cream sandwiches to the fluffy whipped topping and sweet toppings.
Serving Suggestions
When serving this Ice Cream Sandwich Cake, you can drizzle extra syrup or sprinkle more toppings on top for a beautiful presentation. It’s an easy yet impressive dessert that will make everyone smile!
Storage Instructions
How to Keep Your Ice Cream Sandwich Cake Fresh
After making your Ice Cream Sandwich Cake, store any leftovers in the freezer. Cover the dish tightly with plastic wrap or aluminum foil to prevent freezer burn and keep it fresh. The cake will stay delicious for up to 1 week in the freezer.
Ice Cream Sandwich Cake
Ingredients
- 24 ice cream sandwiches
- 16 ounces frozen whipped topping (such as Cool Whip), thawed in the refrigerator
- Topping of choice: such as mini M&M’s, sprinkles, crushed Oreo cookies, toffee bits, chopped nuts, chopped candy bars, chocolate chips, etc.
Instructions
- Place 12 ice cream sandwiches in the bottom of a 9 x 13-inch dish. You may need to cut the last ice cream sandwich in half to fit it properly. Allow it to soften for a few minutes, then use a spoon to gently press the sandwiches down. Skip this step if you're using a deep pan.
- Spread half of the thawed whipped topping over the ice cream sandwiches. Drizzle chocolate and caramel syrup on top. Sprinkle your desired toppings.
- Place another 12 ice cream sandwiches on top of the whipped topping layer. Spread the remaining whipped topping over this layer. Drizzle with additional chocolate syrup and caramel syrup, if desired. Add more toppings.
- Cover the dish and freeze for 1-2 hours, or overnight, to allow the cake to firm up before slicing and serving.
Conclusion
This Ice Cream Sandwich Cake is the perfect no-bake dessert that’s as fun to make as it is to eat. With its creamy layers of ice cream, fluffy whipped topping, and endless topping possibilities, it’s sure to be a hit at any gathering.
If you’re celebrating a special occasion or just craving a sweet treat to cool off with, this dessert delivers both in taste and ease. Plus, with a little time in the freezer, it firms up into a sliceable, delectable cake that everyone will love.